
Creating a Transactional replication:
As discussed in my previous blog we will create a transactional
Replication and see how it works, In this case SQL Server installed in my
laptop is going to host both publisher and subscriber. In Ideal case they will
be different instances on different servers.
For this demonstration I am using student database with just one table.
The subscriber Database is stu.
1) First we need to create
a publisher. The Tables are referred as articles and should have Primary key
defined in order to be eligible for Replication. Expand replication and right
Click Publication and select New Publication. See the image below.

2) New publication wizard
opens. Click Next.

3) Select the database which
you want to be publisher. In our case it is Student. Select Student and click
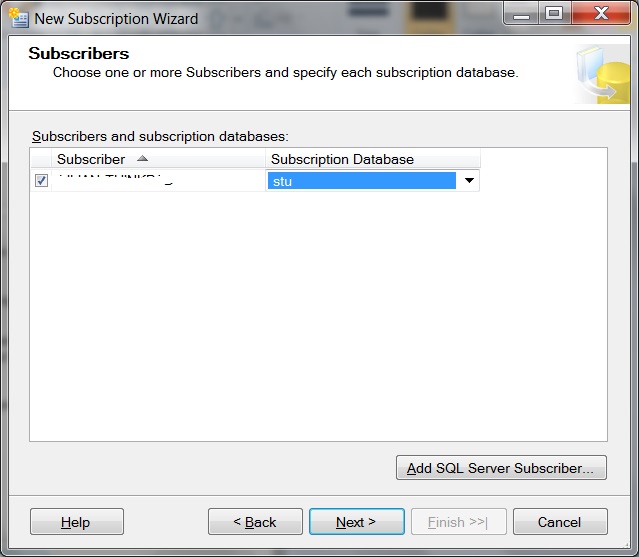
next.

4) In the next windows
Type of Replication needs to be selected. As we are creating a Transactional
replication, select Transactional replication and click next.

5) Select the Tables/articles
which you want to get replicated. Primary key should be defined in the table. Stored
procedures also can be selected for replication. In our case we just have
single table and we are selecting student table.

6) Filters can be added in
the next window. We don’t define any filter criteria so just clicking next.

7) We can schedule the
snapshot, In our case we are creating a snapshot immediately.

8) Select the security
settings in the next window click the security settings. If an service account
is defined for this use please use service account credentials. For demonstration I am using Run under SQL
service agent account (not a best security practice). Click Next.

9) Select Create Publication Option and Click
next.

10) Give a Name to the
publication StudentTest and select
Finish. As described in the summary snapshot and log reader agent run under
service account. Click Finish.


11) Once the publisher is
created we can refresh and expand the Replication tab. Right click the
publisher and create a new subscriber.


12) The subscriber creation
wizard opens click Next.

13) Select the Publisher
database StudentTest and select next.

14) Next is selecting on
which server the Replication agents should run. We are selecting option Run
agents at distributor and click next.

15) In the next section we
need to select the subscriber database. Look for SQL server by selecting the Add
SQL server Subscriber. Select the server name and select the database which
should act as a subscriber. Click Next.
16) Click the ellipsis
button at the right corner and select the SQL server agent as the security. Any
service account with proper access can also be selected. Click Next.

17) Select run continuously
for synchronization schedule. Click Next.

18) Select Immediately for Initialize
subscriptions. Click Next.

19) Select Create
subscription and select Next.

20) Select Finish and Click
Next. Once the article
snapshot are generated it will let you the status of agents and replication.

22) Right click the newly
created under Replication-> Publication -> subscription and select launch
Replication monitor. Under Replication monitor you can see the status of
publisher and subscriber. Insert a token In subscriber which shows the latency
from Publisher to subscriber. In Our case its 25 sec. 3 sec from publisher to
Distributor and 22 seconds from Distributor to subscriber.

.
No comments:
Post a Comment